Evaluation

Time to say goodbye...

I have thoroughly enjoyed this whole project very much to say the least! Throughout these last couple of months not only have I developed my makeup skills but have learnt a decent insight into so many things in the world which I didn't even think existed! I also feel this whole project is very well thought out as the practical sessions which took place were so relevant to the 'Wild Kingdom' brief, and admittedly I would not of  had a clue where to start or what to use without them! I am so happy with my final looks, and I can't praise the run through's enough! Whilst we're at this point i'd like to say a huge thank you to my models and my friends who let me run wild on their face and hair! Wouldn't of got very far without them!


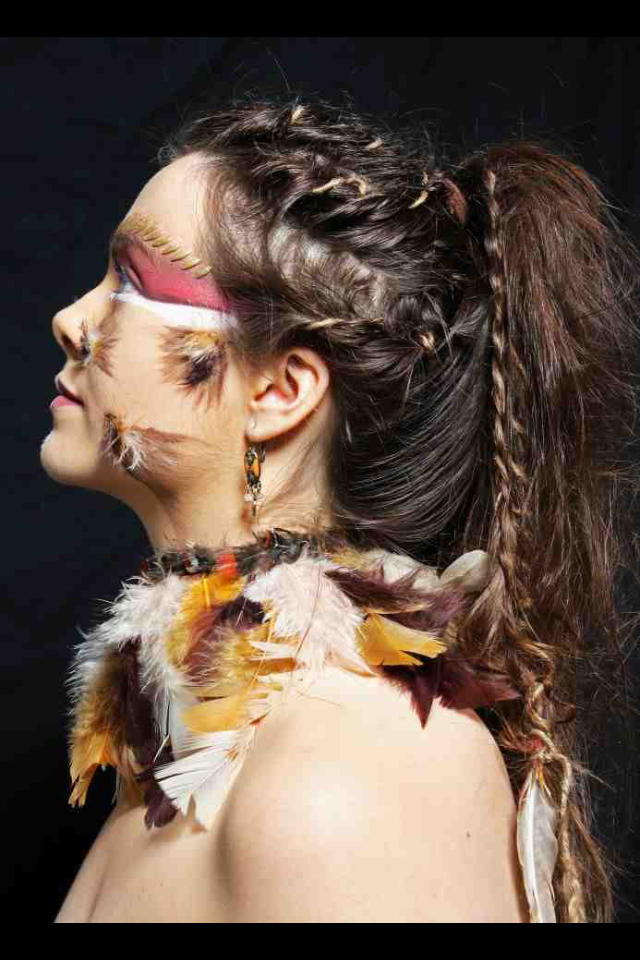
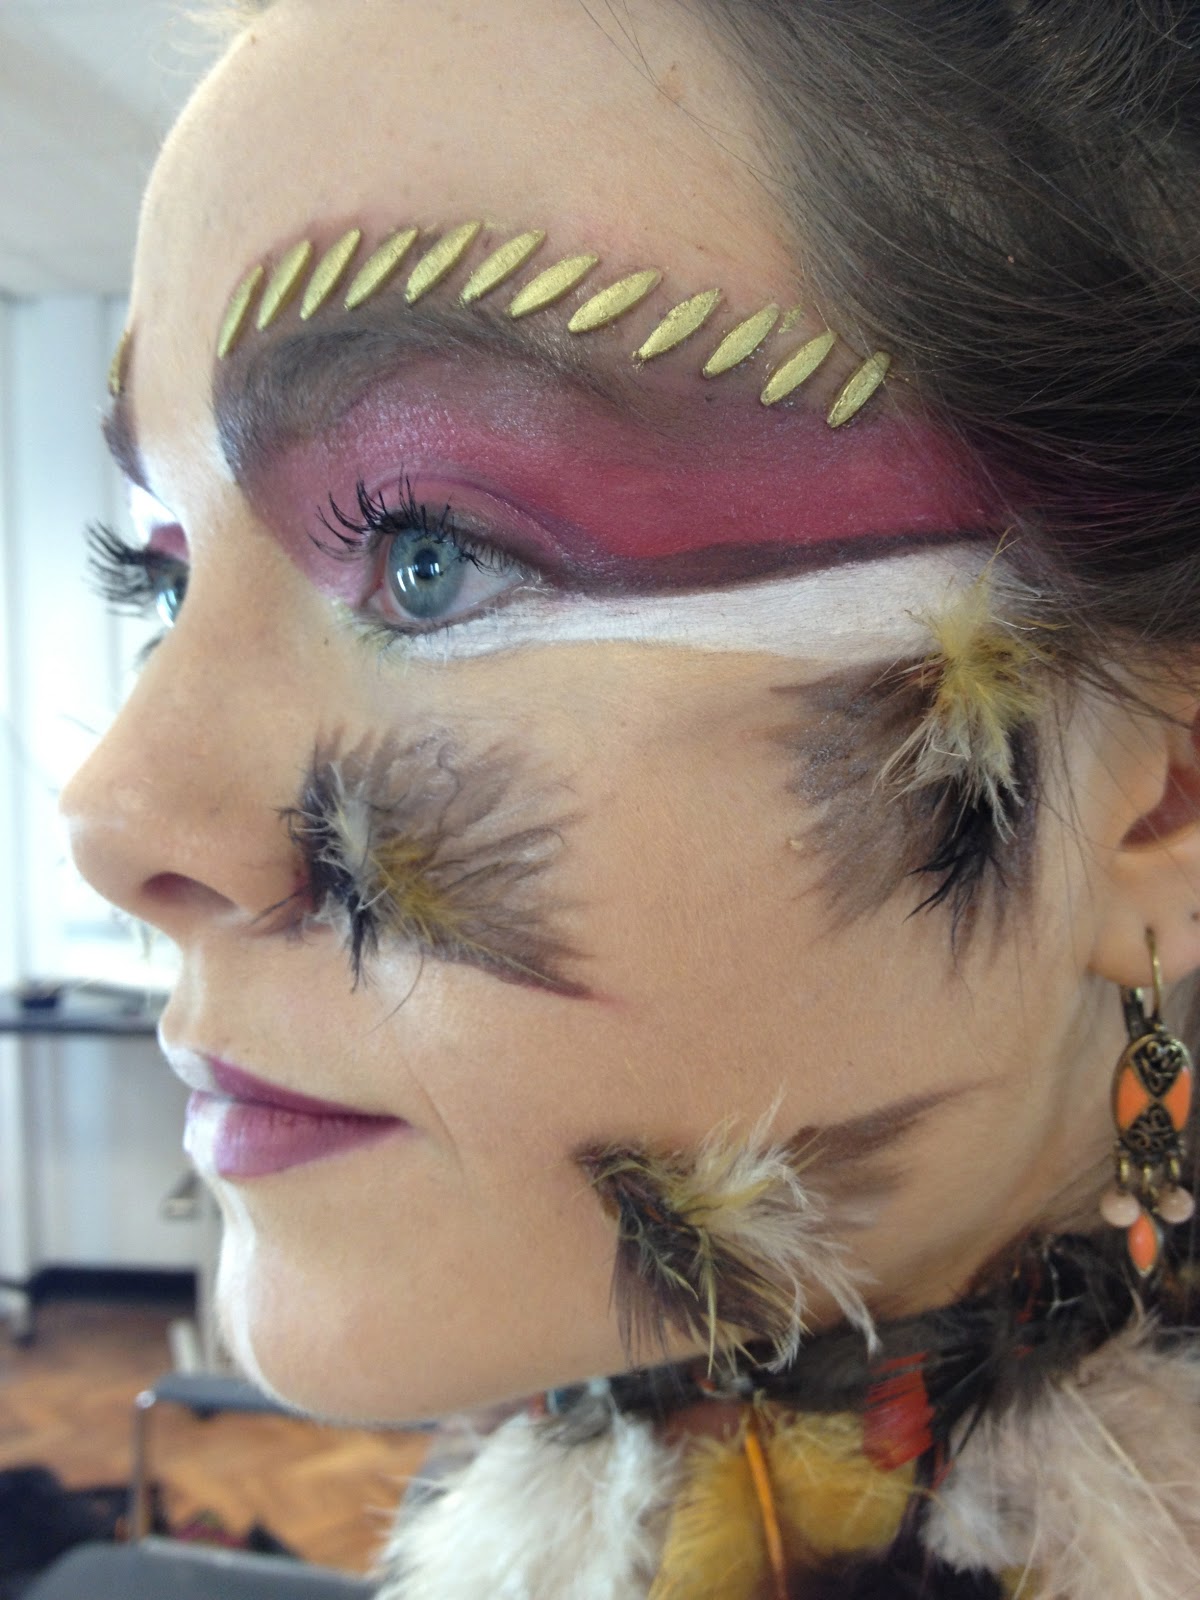
My Editorial went so well, I can honestly say everything went smoothly on the day and I didn't encounter any problems! I did feel very prepared for this shoot and I was ready and eager to do it. I was happy with my styling of accessories, and I couldn't feel more proud of my little necklace creation as I wanted this to be the focus of the styling. I felt really represented the detail in which any editorial shot should include! So from the detailed flicks for the feathered pattern on the face to the string weaved and twisted in the hair, I felt I paid attention to the detail well with this look, giving it a more interesting pull, which ultimately is what the purpose of an editorial shot is!

Simultaneously my catwalk look when doing the final shoot went just as well! Apart from the slight change of idea I feel that I delt with the issue well and adjusted quickly! It is all about thinking quick on your feet, and if someone say's something doesn't look right I guess you need to be quick to think how to change what needs to be changed. So when Sharon told me the half face didn't work I delt with the issue well and carried on, thinking quick how to make this look work. One thing I would definitely work on is my styling for this image, I used the string wrapped around my model to give a 'raw' look, then underneath added a golden leave patterned scarf. The styling did fit the look, and whilst thinking about it if I did a more eye catching style it might of been too much for the whole look. However I definitely do think I need to spend more time when thinking and deciding on the styling. The image as a whole is striking, and I do think it is completely down to the fuller's earth effect. Although the colour palette is limited and if you think about it the whole idea is quite simple, I am still so happy with how each of these factors still give a strong image. When looking at catwalks the makeup and hair was either minimal or extreme... So who wouldn't want to go all out if they have the chance?!

Both images contrast so well and give off completely different perspective's of the tribal look. The difference reflects how varied my research was and also show's any readers how many tribes there actually are over the world and how different they all are! This whole project has opened my mind not only to these new techniques I have learnt but also to this ever so beautiful world.


Catwalk Final Images!


Catwalk final shots with mood board to show how my look reflect it...


Editorial Final Images!


Editorial Final images with mood board to show how the look's originate from it...


CATWALK SHOOT DAY EEEKK!

Time to get this Wild Kingdom to a very near end..

Soon enough my day to shoot my catwalk look arises! I am so happy again with the outcome of this look too! Just shows what all the practice was for and how well it was worth it!! The makeup went well and the look just looked good as a whole! Here are some images of my day!....


EDITORIAL SHOOT DAY AHH!

Editorial done and dusted..

Ahhh so I had my shoot today for my final design for my Editorial look! I felt it went so well!!!! Super super happy with the outcome.. I kept the styling clothes wise to a minimal, and kept it to a black bandeau, as I wanted all the focus to be on my lovely accessory necklace creation ha! I used a beaded set of tribal like earrings to set the look too. Here are a few images of my productive day! Enjoy!...


Ahhhh nearly ready to shoot!

Do's and Don'ts...

Each of my run throughs so far have highlighted any problems which may occur when actually doing the real thing! When doing the run through of my editorial on my friend at home there were many things which I picked up on which could mess up when doing my actual shoot:

  • Getting the cornered patterns on the face symmetrical either side, the eyebrow, top of the ear and bottom of the nose were all good marks to use when figuring out where they should be placed on the face.
  • When using the duo glue, I realised it was stronger than I thought! I only needed a small amount on the end of each feather stuck on the face! However in the run through I put too much on and when it dried I found it drowned out the flick pattern of colours underneath.
  • The rice stuck in a row above the eyebrow, when I painted it gold I used too thick a brush, note to self for next time to use a fine brush like a lip brush!
  • When putting the hair up in a ponytail the hair in the tail was so flat, so maybe considering back combing the hair would be something to consider to make it more volumed?
  • The necklace of feathers that I made looked a little bare at the top, luckily I have found a band of brown feathers with a hint of red which is perfect! I placed this band on top of the necklace when it was already on the neck, and I found it frames it really well! So you will see this genius creation when I do my final shoot...
Highlighted problems for my catwalk look...

  • First of all when applying the fuller's earth to the face there is no point what so ever putting foundation on there, as when I did that in my run through I scraped it all off anyway! So note for shoot; if there are any blemishes use small concealer brush and conceal once fuller's earth is dry! 
  • Making sure the fuller's earth is spread over the face right up to the hair line leaving no gap! This helps link the rice in the hair better with the pattern on the face, doesn't look so separated.
  • Before applying the rice onto the hair, do a smooth layer of the regular fuller's earth mixed with water, so at the end when taking it off the hair you can literally scrape it off.
  • When putting the rice and fuller's earth mixture onto the hair, don't put it on heavily, as long as the texture of the rice is visible on the hair, it doesn't matter how thick it is.
  • Spraying the rice sections gold on the hair works a lot better with tissue underneath it, this prevents the gold spray going anywhere else on the hair.
  • In between the golden rice sections in the hair there was no volume. So when the rice has settled, use a pin tail comb and pull the hair up in between and give it a bit of a back comb if possible!
  • Ensure the ends of the rice sections are pinned at the back tightly and sprayed, the last thing I need in my shoot is for them to loose there position and crumble out of shape!

Sharon says no!


Shazza say's no no no!

So out of the two previous face charts I have designed I feel that the second one included more techniques and was a lot more striking and stronger as a whole as an image. As you can see I decided to use my little rice and Fuller's earth invention on the hair too! I thought it would add to the Fuller's earth effect! But instead this time i used the Screen face gold spray to make the gold more sharp and shiny! Brilliant stuff! So here is my second model Sophie, and actually doing the look on her made me aware of how much space I would have on each section of her face to create the pattern. Anyway so the patterned Fuller's earth went well UNTIL Sharon stated that half faces don't work! So she suggested for me to do it all! So admittedly at the time it was only a run through so I carried on and decided to do a full face chart for my final. So back to the face chart, the eyes looked beautiful; winged out by the dark brown and highlighted by the gold! Sophie's skin is flawless so it made doing the foundation and contouring really easy!


Once the eyes were all done and shaded and the lips were all golden I tested the Fuller's earth pattern in the studio and it didn't show up very well in the pictures, so I chose to use the Aqua colour palette and create a mixture of red and brown. I see the aqua colour to be similar to water coloured paint, its light and simply adds a splash of colour. So using a fine brush I put this colour all over the patter and it came out quite nicely! It gave the pattern a really strong look. I absolutely love the eyes, especially as I went over them with the gold Illamasqua cream which picked up the tear ducts so well giving the design a look of elegance. Here's a little picture of me in action!


Here is my newly sketched face chart.. ready for my photo shoot for my catwalk!


To extend my research into the fuller's earth body idea, I had a look on the internet for a  tribe which help to represent this look and here's what I found...


Here is a body image of how Maasai warrior's from Kenya decorate their body. As you can see it is quite similar to the fuller's earth, instead here they used white chalk paint. This technique is so similar to mine, they have covered the body and carved out the pattern! 


Face Chart's 1 & 2 for Catwalk Shot!


time to walk the cat..

Inspiration from mood board..


Starting my catwalk look now and time is ticking! To get some ideas flowing I did two face charts, trying hard to contrast with my previous looks for my editorial shoot. Referring back to when I did my face shape experiments, I liked blocking out sections of the face and filling it out with colour. Thus my first face chart does just that. In this design I also thought to use the Fuller's earth that I thought was very effective when testing it out on arms. Once the Fuller's earth dried I loved the crackling effect it had, so I decided to include it into this design. Its not so clear in the picture but I actually split the face in half and only used the fullers earth on one half of the face, kind of giving the tribal look a mask. This design was to cover half the face in Fuller's Earth and let it dry without touching it to get that crackly effect. On the other half of the face I drew two sections around the eye that I will block out with bold black and green. The red lips stand out well, and the red, black and green together go well and are definitely tribal colours!


My second face chart I designed soon after is sort of similar in the fact that it's half a face, but a completely different pattern. As you can see I have designed it so the fullers earth is again on one half but this time with a pattern involved. My intention for this look was to get some tribal pattern involved in my designs rather than just having block colours like my previous chart. To create this look I would use one of the mini wooden sticks with the rounded edges that we used in our practical session when creating patterns in Fuller's earth before. Once the pattern is carved out you are left with a lovely crackled Fuller's earth effect. The eyes here are meant to be gold and brown, and surprisingly from my naked palette! The shades of gold and brown really give that royal tribal look, which is what I was trying to create here.